


• Thoroughly clean skin before starting a treatment. Remove any creams, deodorants, antiperspirants and cosmetics from the target areas.
• Avoid sudden movements during treatment. These can cause current fluctuations and may lead to minor electric shocks.
Watch a video of the setup for the old version:
Watch a video of the setup for the upgraded version:
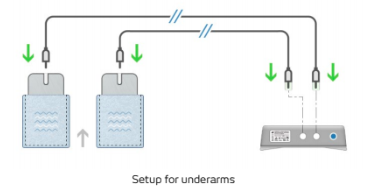
1. Connect a cable to each underarm electrode.
2. Soak each pocket with tap water. The pockets must be completely wet to ensure the current is
spread evenly over the targeted skin of the underarms. Use water between room temperature and
warm (20-40 °C / 70-105 °F) according to user comfort.
3. Insert an underarm electrode in each pocket ensuring it is covered by the pocket in its entirety. If skin comes into contact with the electrode during the treatment, redness or erythema to the
exposed skin could ensue.

Note: If pockets become dry during treatment, tap water can be used to remoisten them. Ensure that the treatment is paused during this process. The treatment will remain paused for two minutes only. If the underarm electrodes are not placed back, the treatment will terminate automatically. The device will then switch to ‘Settings’ mode.
If you feel unpleasant tingling, electric shocks or burning sensations, stop the treatment and make sure the underarm electrodes are sufficiently moist. Lower the treatment current level if necessary.
4. Plug the other cable end into the connectors on the back panel of the controller. The device is designed to automatically alternate the current’s polarity during treatment without the need to manually reverse the cables. There is no difference between plugging the right or left electrode into the right or left connector on the back panel of the controller.
Note: Make sure connectors are fully plugged into the electrodes to prevent unstable connections. This may cause current fluctuations and minor electric shocks during treatment.
 English
  Français
  日本語
日本語 


Comments
0 comments
Article is closed for comments.