


Please select your Dermadry version:
Set Up for Dermadry old version
• Before starting treatment, remove any jewelry from the target areas to avoid risk of electrical burns, redness or irritation.
• Thoroughly clean skin before starting a treatment. Remove any creams, deodorants, antiperspirants and cosmetics from the target areas.
Watch a video of the setup here:
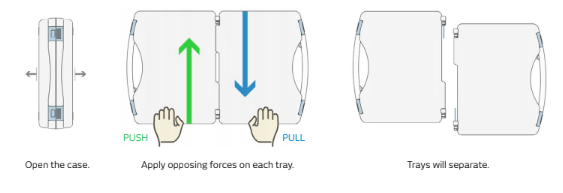
1. Separate the case into two trays and place the trays on a flat, firm surface (e.g. table for hands, floor for feet) in order to avoid water spillage.
Place both trays side by side on a low table if you intend to treat hands. Place both trays side by side on the floor if you intend to treat feet.
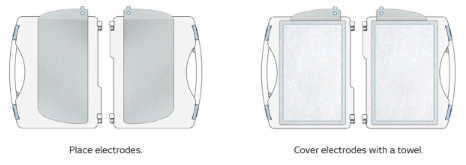
2. Place a hand and foot electrode into each tray.
3. Cover each electrode with a towel.
Note: The case can be reassembled by reversing the steps when the device is ready to be stored.
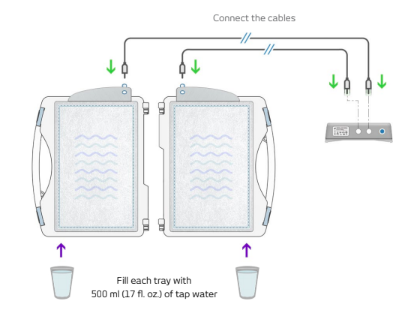
4. Connect a cable to each electrode while plugging the other cable end into the connectors on the back panel of the controller.
The device is designed to automatically alternate the current’s polarity during treatment without manually reversing the cables. No difference is made between plugging the right or left electrode into the right or left connector on the back panel of the controller.
Note: Make sure cables are fully plugged into the electrodes to prevent unstable connections. This may cause current fluctuations and minor electric shocks during treatment.
5. Carefully fill both treatment trays with enough tap water, up to a maximum of 500 ml (17 fl. oz.) per tray.
Ensure that the entire skin surface intended for treatment is in contact with water. Use water between room temperature and warm (20-40 °C / 70-105 °F) according to user comfort.
Click here to see the steps for Performing the Treatment
Set Up for Dermadry upgraded version
• Before starting treatment, remove any jewelry from the target areas to avoid the risk of electrical burns, redness or irritation.
• Thoroughly clean skin before starting a treatment. Remove any creams, deodorants, antiperspirants and cosmetics from the target areas.
Watch a video of the setup here:
1. Place the trays of the case on a flat, firm surface (e.g. table for hands, floor for feet) in order to avoid water spillage.
-
- Place both trays side by side on a low table if you intend to treat hands. Place both trays side by side on the floor if you intend to treat feet.

2. Place a hand and foot electrode into each tray, with the connection stem facing the front direction. 3. Cover each electrode with a mat.

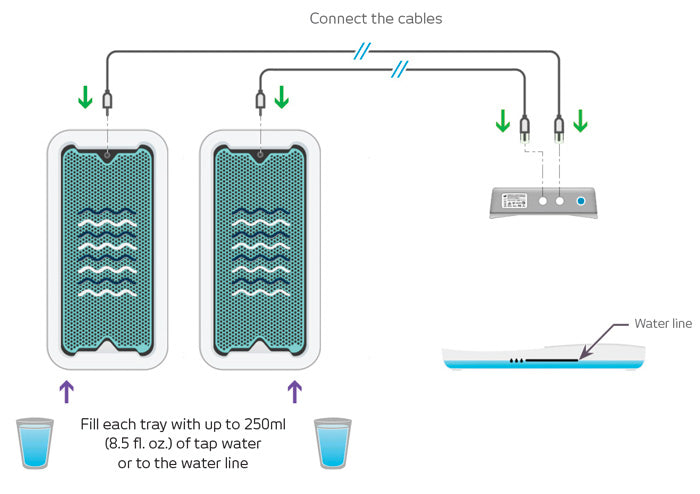
4. Connect a cable to each electrode while plugging the other cable end into the connectors on the back panel of the controller.
The device is designed to automatically alternate the current’s polarity during treatment without manually reversing the cables. No difference is made between plugging the electrode placed on the right or left tray into the right or left connector on the back panel of the controller.
NOTE: Ensure cables are fully plugged into the electrodes to prevent unstable connections. This may cause current fluctuations and minor electric shocks during treatment.
5. Carefully fill both treatment trays with enough tap water, up to a maximum of 250 ml (8.5 fl. oz.) per tray or the water line.
Ensure that the entire skin surface intended for treatment is in contact with water. Use water between room temperature and warm (20-40 °C / 70-105 °F) according to user comfort.
Click here to see the steps for Performing the Treatment
 English
  Français
  日本語
日本語 


Comments
0 comments
Article is closed for comments.